Is pegions are nesting under your panels? If yes, then it is high time to know how to bird proof your solar panels.
To bird proof all of your panels you will need to learn some hacks starting from how to prepare the mesh and use the tools while needed.
In this comprehensive guide, we'll walk you through the process of bird-proofing your solar panels, ensuring they remain in top condition.
Whether you're a DIY enthusiast or considering hiring a professional, this step-by-step guide has got you covered.
The Challenge: Birds and Solar Panels
Birds are naturally drawn to the elevated, warm environment solar panels provide. They view these panels as cozy shelters, perfect for nesting.
Solar panel bird proofing is not an easy task. So, definitely it comes with many challenges to overcome and here are they
Reduced Efficiency: Bird droppings, feathers, and debris can accumulate on your solar panels, reducing their energy output.
Panel Damage: Birds can peck at wires, scratch the glass surface, and even build nests, leading to costly repairs.
Health Hazards: Bird droppings can carry diseases, posing health risks to you and your family.
Noise Disturbance: Bird activity on your roof can be noisy and disruptive.
To address these issues, let's explore the various methods for bird-proofing your solar panels.
How to bird proof solar panels

Here are the step by step process to bird proof your solar panels
Step 1: Gather the Necessary Tools
Before you start bird-proofing your solar panels, gather all the tools you'll need for the job. Here's a list of essential tools:
Measuring tape
Wire mesh (4-inch, 100-foot roll)
Clips for securing the mesh
Cable ties
Wire cutters
Pliers (needle-nose or larger)
Safety gloves
Knee pads
Extra rope
Safety harness
Tool bag for convenience
Make sure you have all these tools ready before heading up to the roof.
Step 2: Measure and Cut Wire Mesh
Begin by measuring the area you need to cover with the wire mesh. Cut the wire mesh into appropriate lengths, typically 5-foot or 10-foot strips, using snips or wire cutters. Make sure you have the correct dimensions to match your solar panel layout.
Step 3: Bend and Prepare Wire Mesh
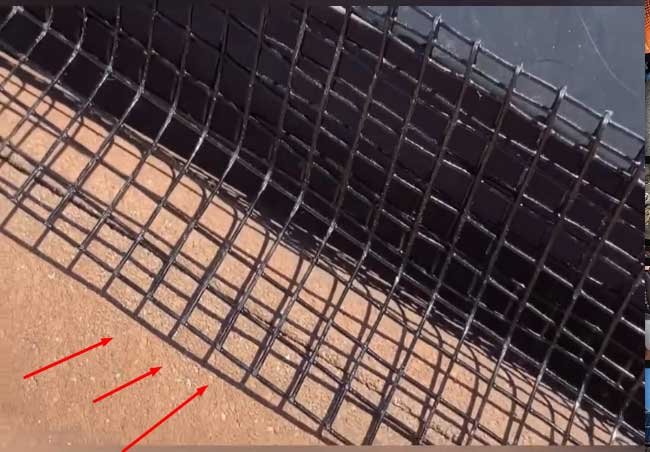
To make the wire mesh more sturdy and secure, you'll need to bend it. Follow these steps to prepare the wire mesh:
Bend the top edge of the mesh to create a flange. You can use a two-by-four or a similar object for leverage.
Bend the flange down to create a double layer on the top edge of the mesh.
To create corners, bend the mesh at a 90-degree angle.
This preparation ensures the wire mesh fits snugly and securely on your solar panels when you're on the roof.
Step 4: Start Pressure Washing
Before installing the wire mesh, it's crucial to clean the solar panel area thoroughly to remove any bird droppings, feathers, and debris. Here's how to pressure wash the area:
Begin spraying water under the solar panels, targeting the space between the panels and the roof.
Make sure to clean the undersides thoroughly, causing debris to fall to the ground.
Be cautious not to spray the tops of the panels.
Cleanliness is vital for an effective bird-proofing job.
Step 5: Prepare Safety Gear
Once the cleaning is complete, it's time to prepare for the installation. Ensure your safety by putting on the necessary gear:
Wear safety gloves and knee pads to protect yourself while working.
Use a safety harness to prevent any accidents while on the roof.
Attach a 25-foot measuring tape to measure the mesh strips accurately.
Calculate the length needed for each strip, accounting for the width and depth of the solar panels.
Step 6: Measure and Cut Wire Mesh Strips
Measure the required length for each wire mesh strip, ensuring they're slightly longer to go around the corners of your solar panels. Cut the strips accordingly.
Step 7: Install Wire Mesh
With the mesh strips prepared, it's time to start the installation. Follow these steps:
Climb onto the roof and position the wire mesh strips on top of the solar panels.
Secure the mesh by bending it over the edges of the panels and use clips, cable ties, or tie wraps to fasten it in place.
Ensure the mesh fits tightly around the edges, leaving no gaps.
Step 8: Complete the Installation
Continue securing the wire mesh around the corners of the solar panels until all panels are covered. Make sure everything is tightly secured and that there are no open spaces where birds could nest.
Methods of bird proofing Solar panel
Method 1: Mesh Wire Installation
One of the most popular and effective methods for bird-proofing solar panels is using mesh wire. This involves covering the space beneath the panels, leaving no room for birds to access.
Pros:
Highly effective in keeping birds out.
Minimal interference with panel performance.
Relatively easy to install.
Cons:
Professional installation may be needed for some roof configurations.
Method 2: Bird Spikes
Bird spikes are another option to deter birds from landing on your solar panels. These devices create an uncomfortable surface for birds, making them seek alternative nesting sites.
Pros:
Non-lethal and humane.
Effective at preventing bird access.
Cons:
Visual impact (aesthetic concern).
Birds may adapt and find alternative landing spots.
Method 3: Electric Shock Systems
Electric shock systems are a more advanced bird-proofing solution. They deliver a non-lethal but uncomfortable shock to birds landing on your panels.
Pros:
Highly effective at deterring birds.
Minimal visual impact.
Customizable settings.
Cons:
Requires professional installation.
More expensive compared to other methods.
Method 4: Bird Netting
Bird netting involves the use of durable, UV-resistant nets that cover the entire solar panel array. This method provides complete protection against bird intrusion.
Pros:
Full coverage and protection.
Durable and long-lasting.
Highly effective.
Cons:
Professional installation may be needed.
Visual impact, affecting the aesthetics of your roof.
DIY vs. Professional Installation
Deciding between a DIY approach and hiring a professional for bird-proofing your solar panels depends on your level of expertise and comfort with heights. Here are some key considerations:
DIY Bird-Proofing
Pros:
Cost-effective.
Suitable for simple roof configurations.
Personal satisfaction of a DIY project.
Cons:
Limited to certain methods (e.g., mesh wire).
Risk of incorrect installation.
Safety concerns when working at heights.
Professional Installation
Pros:
Comprehensive solutions for all roof types.
Experienced and skilled installers.
Guaranteed results.
Cons:
Higher cost.
Requires scheduling and coordination.
Conclusion
Keeping birds away ain't easy from Solar panels but I tried to sort out the most effective DIY here. Whether you choose to tackle it as a DIY project or enlist the help of professionals, the key is to act promptly and effectively. By understanding the methods, tools, and considerations involved, you can keep your solar panels bird-free and operating at their best. Don't let avian visitors compromise the benefits of your solar energy system—take action today to bird-proof your panels and enjoy years of trouble-free energy production.